Avatar: The Four Elements
UPDATE November 2012: So, wow, I felt compelled to just update this post a bit as it’s been about 4(!) years since I created this blanket just out of love for Avatar, and decided to share a pattern for it to spread the love 😀 I’m glad that so many people have enjoyed making one of their own! If you have questions, make sure to skim through the comments as a bunch have been answered already. And yes, this is a pretty massive project… the blanket comes out to be able to fit the size of a queen bed. So it’s quite an undertaking, but a lot of fun. And because I get this question a lot – no, I cannot make one and sell it to you… like I said, it’s a huge project, so I would have to charge a crazy amount of money to make it worth the time to do more. That’s why I made a free pattern 🙂
I wanted to point out in case anybody wants to try to knit this instead of crochet, somebody did that on Ravelry and wrote some notes on her modifications here. I haven’t knitted this, so I can’t answer specific questions on translating it.
Lastly… Korra is completely badass, AMIRIGHT?!
Avatar: The Four Elements
An Avatar: The Last Airbender blanket
Because I figure if you have an all-consuming, unnatural obsession that pretty much takes over your life with little remorse for its own part… well, you might as well be productive about this, right?
![]()
![]()
![]()
![]()
![]()
![]()
____________________________________________
Pattern:
Make sure to read through all instructions before starting!
Skill Level: Intermediate
____________________________________________
Materials:
Crochet hook – Size K (6.5mm)
Yarn needle
Square Background colors:
Yards = Approx. 546 of each (1.5 skeins, 7 oz.)
Red Heart Ltd. Super Saver Solids
– Ranch Red (fire)
– Frosty Green (earth)
– Lt. Blue (water)
– Aran (air)
Square Foreground colors:
Yards = Appox. 473 of each (1.3 skeins, 7 oz.)
Red Heart Ltd. Super Saver Solids
– Black (fire)
– Coffee (earth)
– Windsor Blue (water)
Red Heart Ltd. Super Saver Multi
– Grey Heather (air)
For the borders connecting all four squares:
Red Heart Ltd. Super Saver Solids
– Buff, 728 yards (2 skeins, 7 oz.)
– Café, 364 yards (1 skein, 7 oz.), or one additional skein of Buff
____________________________________________
Gauge: 14 scs/14rows = 4 inches
Note: Exactly matching the gauge is not critical since this uses charts based on numbers of stitches, rather than any sort of dimensional measurements.
Finished blanket size: Approx. 72 x 72 in.
Size of each nation square: Approx. 31 x 31 in.
____________________________________________
Abbreviations:
BG = background
ch = chain
cl st = cluster stitch (YO, insert hook in stitch, pull through, YO, insert hook in stitch, pull through (5 loops on hook), YO, pull through all loops)
dc = double crochet (YO, insert hook in stitch, pull through, YO, pull through 2 loops on hook, YO, pull through remaining 2 loops on hook)
FG = foreground
hdc = half-double crochet (YO, insert hook in stitch, pull through, YO pull through all loops on hook)
Rnd(s) = round(s)
sc(s) = single crochet(s)
sp(s) = space(s)
st(s) = stitch(es)
YO = yarn over
____________________________________________
Each nation square of the blanket (Water, Earth, Fire, Air) will be completed separately then joined together at the end. You will be working with two colors at the same time – the foreground color (for the actual design on the chart), and the background color.
Download the charts here:
On the chart:
1 white box = 1 sc in BG color
1 grey box = 1 cluster stitch in FG color
Do not break the yarn to change colors! Instead, you will be carrying both colors through the entire time, crocheting one color around the strand of the other. The outside color will be the visible color; the strand of the color running through the crocheted rows will be hidden (it will, however, peek through the spaces, which creates a nice visual texture). This way it will be simple to switch between BG and FG when you need to.
You’ll need to carry the second color through the entire square, even through large patches of only the BG color where the second color is not needed, in order to keep the same thickness throughout.
To change colors, see how the air FG color is carried through the middle, and you crochet around the inside color:
 .
. 

To switch, when you begin a sc or cluster st, just grab the opposite color and continue with the pattern.
Note: You’ll probably have to tug the inside strand along as you go, so that it doesn’t bunch up in the spaces.
____________________________________________
To begin a square:
ch 95 in BG color, turn, sc the entire way across (94 stitches).
This is row 1.
ch 1, turn
1 sc in BG color; attach FG color with 1 slip stitch; continue with BG color scs
Then work the rows according to the chart. At the end of each row, ch 1 and turn. Make sure you are single crocheting with the BG color in the white boxes, and using the cluster stitch with the FG color on the grey boxes. Pay attention to whether you are working on the front or back side of the project as well, since you’ll be turning it back and forth, and you do have to account for that while working the squares. (So, for instance, if you work row 1 by reading the chart from left to right, you’ll end the row on the right side. When you turn the work, you’ll still be at the right side, so you’ll have to work row 2 by reading the chart from right to left. And so on and so forth.)
When you’ve finished a square, finish off only the BG color and weave in end. Use the FG color to make a clean, exterior edge for each square:
Edge:
1. hdc around all four sides of the square. (For this first row, instead of going in the v’s on the top and bottom of the square, I dipped down into the first row of spaces in order to make the edging stronger)
Row 1 corners: hdc 3 times in the corner st
2. dc, ch 1, skip next st, dc, ch1, skip next st – repeat all the way around
Row 2 corners: dc in corner st, ch 3, dc in same st
3. hdc around
Row 3 corners: dip down to hdc 3 times in the corner space of the
first row. This makes the edge a bit stronger, as well as allowing
the corners to look cleaner.
Break yarn and weave in end.
____________________________________________
To join it all together:
Once all four squares are done (which is no small feat, so go you!) it’s time to join them all together. You’ll first connect them vertically (Water on top of Air; Earth on top of Fire), and then horizontally (Water&Air on the left side, Earth&Fire on the right side).


Vertically:
First, join Water to Air, and Earth to Fire with that middle border. With the Buff color, sc 5 rows at the bottoms of the Water and Earth squares, and 5 rows to the top of the Air and Fire squares. Carry a second color through the borders as well so that, as stated above regarding the regular nation squares, the same thickness can be maintained throughout the blanket. I carried my leftover Aran through (you should have about half a skein left, which is plenty).
You’ll need to join them by sewing. The best method I found was the mattress stitch. It will leave a seam on the back, but the front will be wonderfully invisible, which is the important part.
With the right sides facing up, line up the bottom of Water with the top of Air. Make sure they’re facing the right ways! This is an in-progress picture of sewing Water and Air together:


To begin sewing, thread the yarn needle with a long strand of yarn and insert the needle in the bottommost space on the left side (in these pictures, the Water square), and then through the bottommost space on the right side (the Air square). Pull these tightly closed.
Stitching up the seam will be done by simply threading the yarn back and forth between the posts of the crochet stitches.
First the left one:


And pull the yarn through (it doesn’t have to be tight just yet):


Then insert the needle through the corresponding post on the opposite side and pull through:


When you have a few threaded stitches, pull the yarn up and away from you so that the stitches come together and close tightly. I found that it works best if you do this in intervals of 4 or 6 stitches.


Do this the whole way up the seam, and end it by connecting the top two corners the same way you started it.
Repeat this to connect the Earth and Fire squares.
Ta-da! Once you get the hang of it, this is not difficult at all and goes rather fast. If you’re confused, I’d recommend watching the video of it on knittinghelp.com (on this page, the video called “mattress stitch” under the Finishing section). They show how to do this for knitting, but it’s by watching this that I was able to understand the principle and adapt it to work here.
____________________________________________
Horizontally:
Now you have Water and Air joined, and Earth and Fire joined. It’s time to connect these two pieces together, which will be done exactly the same way. Right sides facing up, Sc 5 rows on the right side of the Water&Air piece, and sc 5 rows on the left side of the Earth&Fire piece. Again, carry your leftover Aran yarn through the middle.
You’ll notice in the pictures of my finished blanket, in this joining border I added rows of a dark brown (Café) colored yarn mostly to make this neutral border more interesting! (You don’t have to do this if you don’t want to, this is your blanket, so it’s up to you… if you choose not to do this, you’ll need to buy 3 skeins of Buff instead of 2) So for each of these sides, do: 2 sc rows of Buff, 1 sc row of Café, 2 sc rows of Buff.
Join each side together with the mattress stitch, as described above, using the Buff color.
____________________________________________
Exterior Border:
You’ve reached the last step, yay! With the right side facing, you’ll crochet around the entire blanket to complete a nice exterior border. Join with Buff in any corner, and then do so in the following:
1 Rnd each of:
sc in Buff
dc Buff
sc Buff
dc Café
sc Buff
dc Buff
sc Buff
To go around the corners for this: sc (or dc, depending on the row you’re on) 3 times in the corner stitch before moving on. Again, run your extra Aran through the middle.
Finally, once that is completed, cut the Buff and Aran yarns and weave in ends. Join the Café color in any corner and do the edging the same as you did for each individual square (the list of 3-numbered rows described above, just after the completion of a square).
AND YOU’RE DONE!
Go buy yourself a well-deserved latte… then sit back, curl up with your new blanket, and bask in the Avatar love.
____________________________________________
Tips:
I’d recommend forming the Earth square first because the design is the simplest, and it starts out completely symmetrical.
At the beginning of each nation square, it will start to buckle and curl as you start to put in the cluster stitches (because these take up more room than a sc). But don’t worry about it, and just keep going; it will work itself out as you progress.
Print out each pdf and mark off the rows as you do them. It makes things much easier, trust me!
Since I used cheap acrylic yarn, the project turns out not as comfy as you might like a blanket to be (if you are one of those lucky ones who are not on a budget, you may prefer to use a higher quality yarn). However, you can easily soften up the completed project by rinsing it thoroughly with some water and putting it in the dryer with a dryer sheet (or run it through the washing machine with some fabric softener). I did this separately with each square as I finished them. Then when the blanket was done I just rinsed the borders and put it in the dryer in order to soften up those parts up. This trick also helped to take out any extra curling the edges of each square might have.
And this one last, very crucial tip: Make sure to watch your Avatar DVDs while working on this blanket. On repeat. For several hours at a time. …Or, you should watch them even when you’re not working on this blanket, really.
And remember to HAVE FUN.
Avatar: The Last Airbender is (c) Viacom, Nickelodeon, Mike & Bryan, etc etc.

thank you so much for these charts. You have made my life SO much easier!
It’s beautiful!!
i was wondering if on the pdf for the water symbol, you meant to have 95, instead of 94… and will it make a difference if it has 95 stitches instead of 94?
Nicole, no it should not make a difference. It was just how the water pattern worked out. I think that was the first square I did, so that’s why it didn’t quite match up with the others. But I don’t notice a difference, and I think the blanket is so big anyway that the absence of just the one stitch length is incidental.
Thank you so much for posting those pictures! I wanted to get those element symbols tattooed onto my leg ever since I saw the first season of Avatar. Those are theee best since the pics are so big. Thanks againluke
Like Cry said this is and Awesome afghan…I would SO like to make this 4 my family….But when I went 2 Save the pdf.’s ALL i got was a WHite screen…..and NO pattern…I’m hoping it’s either something I did or that I could get U to send the patteren to me thru e-mail….I hope U can Help me …. I have my yarn and I’m setting on ready..(I dont ususally do that but I was So excited when I saw this pattern that I couldnt wait LOL)Just in case here’s my e-mail: brneysblu2@yahoo.com
This is too cool! I have to make this for a friend who is Avatar obsessed!
I just wanted to tell you that I’m in the middle of this… it’s taking forever, but my best friend and her kids are Avatar-obsessed but crochet-challenged. I think this is the biggest hand-made Christmas gift I’ve ever made! Hopefully I’ll get it done before next Christmas. 😉 But kudos for a clear tutorial and awesome charts. It’s all very well thought-out, and turning out beautifully (I’m halfway through Water and 3/4 through Earth).
Hey there! I absolutely love this blanket!! I’m making one for my mom now and I was wondering exactly how you carry the FG color through the square. Maybe I just don’t get it but do you carry it through the chain stitches too? Do you pull it through each stitch as you’re doing the BG color? Maybe I’m just thick but this color changing is what’s throwing me off…
tokyokitty: Glad you like it! No, you do not do it during the chain stitch. You attach the FG color as you start the first row of each square. Yes, you’re right, you pull it through all the BG stitches. Just hold the FG color along with the BG color, and just make the crochet loop around the FG color, so that the FG color is in the middle of the BG crochet stitch. I’m not sure if I can explain it any clearer than the pictures and explanation in the pattern Maybe you could try it with a swatch until you get used to it?? 🙂
*JAWDROP*Holy OMG, this is the most amazing thing I have ever seen. Thank you so much for taking the time to post this pattern. I have no idea how to crochet (I'm a knitter) but I'm going to learn so I can make this sucker. GAH. it's SO COOL.
Great project.Inspiring…Here is another four elements project By the artist David Weitzman
I really want one…too bad I can't crochet!
Fantastic! I recently got addicted to Avatar through netflix! Now I can't wait for Book 2 to arrive at my house!
Oh man I love this! Thank you so much for the pattern. Goddess Bless youSagewich aka Jeanie
Beautiful! Now if I only knew how to crochet!
Amazing! I absolutely adore it. I only wish I had found this a couple of years ago. The suspense waiting for the final episodes during the writer's strike was killing me! I wish I had thought to look up crochet patterns! I will definitely make one for my family and maybe even my little brother. Absolutely beautiful job. Thank you!
I'm so glad I know how to crochet! The pattern looked a little complicated before I started but I just finished the Earth square and it was actually really easy!Thank you so much for making this pattern, I can't wait until its done! Time to work on the Water square next 😀
Soooo very cool. Just made an aang hat but this… This is tops! Gotta make this for my boys. (hubby and son)
This is such a cool project. I’m about halfway through it (thank you thank you thank you for the patterns!) but the links to the pattern pdf’s seem to have died. Is there a way I could get them from you through email or something?
Thanks! 🙂
Hi there, sorry about that. I updated the links and pictures, so everything should be working again!
Thank you so much!! You’re awesome. 😀
I have this post saved in my bookmarks because when I’m done with my current projects I intend to tackle this. It’s so beautiful! Thanks so much for sharing!
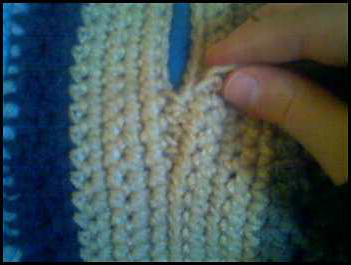
Hi! As everyone else has already said this is amazing! You are truely talented! i was hoping i could ask for you guidence the only stitch i just cant figure out is the cluster. maybe im doing it wrong but im not sure how to explain what the problem is. i understand yo pull it through the next stitch yo… but then you have that through 5 stitches and you end up only pulling 1 all the way which makes you missing several stich to go through on the next row. i hope that makes sense.

this is one of the photos im following to learn the stitch
hopefully you can help me
thank you so much!<3
sorry im making this so long:[ but i just realized that maybe im not suppose to be clustering into 5 different stitches but just 1. It still doesnt look anything like yours though. anyways that was just a side note
Hi Sarah,
That’s correct, you don’t make 5 separate stitches, you keep pulling through the same opening to make one giant stitch. You’ll have 5 loops on your hook at once, and then pull them all through. It’s just like how you’d do a double crochet, but just keep pull through until you have 5 loops.
This stitch is done to make the foreground design thicker, and much more visible, than just doing a single or double crochet.
I hope that helps!
Kim
Beautiful,thanks
Thanks so much for this pattern! I’m working on the Earth square to begin with, and I’m a little worried that the cluster stitches are so much taller than the single crochets. Not sure how to explain it any better but here’s a picture!
Did it go like this for you? Does it even out in the end? Considering unpicking and just doing single crochets in the FG colour as well instead of the cluster stitches.
Yeah, that’s fine… it’ll actually pucker up a bit too, until you get a little over halfway through a square, if I’m remembering correctly. Once you finish a square, it lies pretty flat, and sewing it all together and adding that border will help it further lie flat. I had tested it when I was working on it with just doing fg stitches the whole way through, and it didn’t work out so well because you could see peeks of the background color in the foreground stitches. The cluster stitches worked well because they’re thick enough to completely cover the background color. Hope that helps!
Thanks so much for the speedy reply – much appreciated! I’m going to keep on going and take it on trust that it will turn out ok 😛 can’t wait to have it finished, but I’m loving watching the series while crocheting it!
Sure, you’re welcome. Also when I said “fg stitches” I meant to say single crochets. D’oh.
Pingback: ‘Avatar: The Last Airbender’ Four Elements Blanket
This is awesome ^_^ congrats on such a massive project and tute 🙂
This looks awesome! It’s on my project list now (gotta finish the baby blanket for my niece-to-be and the Kingdom Hearts blanket for my husband first).
Pingback: Avatar blanket on GeekCrafts « Kim Kiser Art
I can’t wait to start working on this project! My fiance and I are huge fans of Avatar, and now that we’re looking into a place of our own, we’ll be able to have a little piece of an amazing series to snuggle up with! I just started a new job that’s all backshift, so this will give me something to do so the 12 hours don’t seem so long and I don’t fall asleep! My future mother inlaw’s taught me the single crochet stitch, and she may even make this as a project to display at the craft store she works in! Thank you for the beautiful pattern; it’s making it’s way around the family! ❤
Sweet! Make sure to send pictures if it’s displayed in the craft shop!
I certainly will!
LOVE THIS. But the pdf files aren’t working for me….apparently I “dont have permission to view this document” or something. Help?
That’s weird. It was set so anyone with the link could view it. I’ve changed the sharing settings to public, so go ahead and try it now.
YESS!! Thank you so much!!
I SO want this quilt! ❤ But I have no idea how to crochet and am really intimidated by this. Any suggestions as to how I could attempt to even do this?
Well, you’d have to learn how to crochet first. It’s pretty easy so don’t be intimidated. Or find a good friend or family member to do it for you.
Well, I kinda know how to crochet, but only in a straight line. I don’t know how to make anything other than that! lol. I so will learn how to though because this quilt is the most awesome thing ever. How long did it take you to complete it?
It took me about 100 hours, give or take. But I was also figuring out the pattern while I was making the blanket.
when i was looking at the fire pdf, i noticed it had 95 stitches across. is it supposed to be like that? i may have counted wrong, but I just want to make sure.
by the way, this blanket is epic!!!! I am a huge avatar fangirl and crocheter. how did you come up with the pattern?
Just wanted to thank you for the pattern and say I just finished the blanket a couple of weeks ago!
Here it is if anybody wants to see:
http://aluminumwalls.wordpress.com/2012/01/10/the-avatar-blanket/
Yours looks fabulous! ! I like the color change. I wouldve hated it if I did it, so it is nice to see variations. That way, when i start mine, I won’t expect perfection. I found a batman scarf that has driven me insane and it was supposed to be my precursor to a tardis blanket, but this has become my new next goal!! I just hope mine looks somewhat close to as awesome as yours and hers is!
Pingback: The Avatar Blanket | By Land, By Sea, By Dirigible
Pingback: Oh yeah, this blogging thing… « The Adventures of Faith
I am self teaching myself how to crochet just so I can make this amazing blanket! I’ve been practicing on a smaller scale just to get used to go back and forth with the different colors. So this question may seem really dumb, but whats the purpose of doing the cluster stitches in the foreground color? Is just changing to the foreground color and doing a single chain not enough for it to stand out? I feel like my chain stitches are very puffy and are causing my piece to get very lopsided.
Yup, a sc for the foreground color does not make it stand out enough. I experimented with that early on when developing the pattern.
From the post: At the beginning of each nation square, it will start to buckle and curl as you start to put in the cluster stitches (because these take up more room than a sc). But don’t worry about it, and just keep going; it will work itself out as you progress.
So you should be fine. Have fun! 🙂
This is amazing!! Thank you so much for sharing- I’m definitely going to make this!
Hi! I would love to tackle this project but I can’t get the charts to come up. When I right click it only allows me to “save link as” which doesn’t work as it just takes me a google page. :S
Try now…. they’re all set to public so I don’t get why they wouldn’t be working.
Ahh. It doesn’t work with Firefox. I was able to download them by using internet explorer. Thanks!
It looks like the links for all the charts (except for air) are broken…D:
Hmm, try now. They’re all set to public.
I can’t seem to open the links for the charts to download them. I keep getting redirected to a google site
Try clicking directly on the links to open the google doc, and do file>download from there.
Thank you, I was able to open them and download them…can’t wait to make this for my daughter who is a big Avatar fan.
I still can’t get the links to work…bummer. When I open the links, it just takes me to the Google Drive home page.
I love love LOVE this blanket. I ust finished the fire nation block, it took me about 20 hours (give or take a few hours), I couldn’t put it down. I’m starting my water neation block right now. Again, this is an amazing patern and the directions are really easy to follow.
Since my boyfriend and I are massive fans of Avatar, and I learned to crochet this year… guess what I’m making him for Christmas? And tonight (yes, it’s August…) is the night I am going to start making it. Yip yip?
Pingback: Keep Calm, Carry Yarn, and Crochet the Elements | Faith, Words and Whimsy
I was thinking about making a baby blanket out of this, but would like it much smaller than 72″ (since it is for a crib) anyone have any suggestions on what I should do? I was thinking using smaller yarn, and smaller hook, but I am still not sure if that will get it where I want it.
Suggestions please!
Hmmm. You might try knitting it because knitting = smaller stitches, with a really thin yarn and small needles. You could try that doing just one of the squares and seeing how that turns out.
Pingback: Half Way There! | Faith, Words and Whimsy
Hi, I wanted to try this, but I don’t understand how to exactly connect the two colors together in the beginning of the square. Any advice?
I am a complete Avatar fan and own all the DVDs. I am going to LOVE making this blanket! Thank you so much for allowing others to make this awesome blanket!
I just have a quick question. I noticed you said that you have no intention of making and selling these blankets, and I was wondering if you were allowing anyone else to sell them, as long a they credit you.
That is a gray area as this is somebody else’s property and I don’t think this would fall under the “parody” category which would otherwise make it okay. I would not recommend making any money off of this (which is why I put up the pattern for free vs. selling it) due to possible repercussions from Nickelodeon.
I absolutely love love LOVE this pattern. I just started learning Tunisian Crochet and it seems like this pattern would be easy to transfer (with out the cluster stitches). If I just did each square with a Tunisian simple stitch but kept the borders in regular crochet following your pattern, do you think that would work? I saw that someone transferred it to a knit pattern so I will check that out as well. Thoughts or concerns?
P.S. Korra needs to come back NOW!
I knew tunisian crochet at one point, but all my knowledge of it has leaked out of my head. I would say that you should do a test and see how it works out! Good luck! 🙂
And I ❤ Korra!
I did a test square of a smiley face. It curls a bit but was pretty easy to learn. I had to refer to a couple YouTube videos for help changing colors. Once I understood that it went smoothly. Can’t wait to start on this blanket soon! 😀
I completed this a few months ago and am about to start on the Air square. I love how it turned out! Thanks a million for this pattern!
Nice!! I’m glad that worked out for you!
I’m not sure if I’m working this correctly. I started with the Earth square like you suggested. When you are carrying the secondary color through your work, do you just pretend the second color is part of the stitch you are going into? The secondary color is not worked into the stitch just around it. So the second color is a single string hidden underneath your stitches until it is used?
Yep, that’s correct! Just work the primary color yarn around it so that it gets hidden inside, like it’s not even there. Then when you need it you can just grab that strand and switch!
Pingback: Avatar: The Four Elements Blanket
Is there a reason why you used a hook 1 mm larger than the suggested size for the yarn?
Because I felt like it.
Thank you for making/sharing this pattern, I’ve been wanting to make something like this for a while, and am glad to have found this.
Hi –
I can’t download the patterns but I’d love to make this for my son – have they been taken off?
Sarah
They are still working for me. Does this direct link work? Try in a couple different browsers.
https://docs.google.com/file/d/0B9QTNDVwHjkqMjIyYTU3M2ItOTQ3OS00ZjkwLThlYmItYzQ5M2IzZmJhMWI3/edit?authkey=CPaX2cID&ddrp=1&pli=1&hl=en#
Thanks Kim – Chrome works! Beautiful blanket – I just hope my crochet skills are up to it!
I have been working on the earth block. I’m not sure if I’m doing it right. I’m on 12 th row and the cl st buckles a lot. It looks like ribbon and it just the cl stiches that look like that. Is it supposed to look like that. My daughter found this pattern and wanted me to make it for her birthday.
I am using Google Chrome and the pdfs wont download. It just shows a white screen. I tried it on firefox also and it wont load either. Are the patterns down?
Try them from the newer post here: http://www.kimkiserdesign.com/portfolio/avatar-the-four-elements-blanket.html
They work for me fine on Chrome. Let me know if you still have problems. You can also try right click > save as to save the pdf directly.
Hey this blanket is amazing ^.^ How much did all the yarn cost?
I love the blanket and I will be making one. This is just so beautiful! How long did it take to make one square?
This is beautiful
Just a quick question about carrying the yarn the whole way. I know how to carry it in the row, but I’m stumped as to how to carry it without it showing when I reach the end of a row and start a new one. How do I properly continue to carry the yarn when I move on to a new row? Thanks in advance!
It won’t matter if it shows because you will crochet a border around on the entire square after each one is finished 🙂
Pingback: Welcome to my blog! | The.Handmaden
Hi, I know it’s been like like ten years since this was originally posted, but do you think you could update it because some of the links are broken, and I would really love to make this! Thank you!
Hi! I’ve updated the links. Let me know if they work now. Thanks for bringing it to my attention!
Hi! Thanks for that. The images of your examples still appear broken, though.
Ugh that’s so weird! I re-added them again. Hopefully it is all working now!
Hi Kim! The links are working. Would you mind updating them again?
Thank you for making this amazing thing and sharing it with us!
Hi there, the links are still working for me. What do you get when you try to access them?
I’ve been working on this blanket since about mid-November and this week is gonna be crunch time if im going to complete it as a Christmas present for my best friend (he’s been obsessed with avatar since the show first aired, and got me into it last year) It’s absolutely beautiful so far! I’ve finished water and earth, ill finish air and hopefully start on fire today, and if i work the same pace i did on earth and air i should be able to finish the whole project next weekend. i honestly want to make one for myself now, but I might take a break between finishing this one and making mine 😀
Pingback: Avatar blanket – Sippin in the Sherage